Android Integration
Get Started > Cleardil SDK > Android Integration
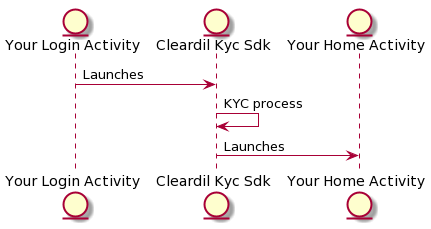
Lifecycle explanation
Our SDK is using the classic Android activity lifecycle in order to run.
Which means your Activity will run our SDK activity and then our SDK will run your next activity.
Example with a login / home page mechanism :
1. Adding Cleardil repository to gradle
First you will need to specify your credentials to Cleardil artifactory repository in the gradle.properties file :
artifactory_user=<user> artifactory_password=<password> artifactory_contextUrl=https://cleardil.jfrog.io/artifactoryThen add this to your build.gradle to reference our artifactory repository in your project :
    buildscript {        repositories {            jcenter()        }        dependencies {            classpath "org.jfrog.buildinfo:build-info-extractor-gradle:4+"        }    }
    allprojects {        apply plugin: "com.jfrog.artifactory"    }
    artifactory {        contextUrl = "${artifactory_contextUrl}"   //The base Artifactory URL if not overridden by the publisher/resolver        resolve {            repository {                repoKey = 'cleardil-gradle-release'                username = "${artifactory_user}"                password = "${artifactory_password}"                maven = true            }        }    }
And add to your app/build.gradle :
  android {        String storageUrl = System.env.FLUTTER_STORAGE_BASE_URL ?: "https://storage.googleapis.com"        repositories {            maven {                url "$storageUrl/download.flutter.io"            }            maven {                url "${artifactory_contextUrl}/cleardil-gradle-release"            }        }    }
    dependencies {        implementation 'com.cleardil.sdk:cleardil_android_sdk:1.2.0'    }
2. Basic calling of Cleardil SDK in your code
Add a Flutter activity to your AndroidManifest.xml :
<activity android:name="io.flutter.embedding.android.FlutterActivity" android:theme="@android:style/Theme" android:configChanges="orientation|keyboardHidden|keyboard|screenSize|locale|layoutDirection|fontScale|screenLayout|density|uiMode" android:hardwareAccelerated="true" android:windowSoftInputMode="adjustResize"/>Use the implementation of KycModule builder :
KycModule.builder() .withSdkToken("<yourtoken>") .withEnvironment(KycModule.Environment.Demo) .withTargetActivity(HomeActivity.class) .build() .start(LoginActivity.this);You will need to replace
You will also need to specify the Cleardil Environment (PROD, SANDBOX or DEMO) you want to connect to.
Use the Demo environment if you do not want to connect to Cleardil Environment.
As explained before you will need to specify an Activity class which will be launched at the end of the Cleardil SDK.
This code will instantiate the ClearDil Kyc Module and start it.
3. Advanced call
You can specify which type of document is allowed for your clients with theses methods :
allowPassport()allowIdentityCard()allowDriverLicense()withVerification()Example with the KycModule builder :
KycModule.builder() .withSdkToken("<yourtoken>") .allowIdentityCard() .allowDriverLicense() .withVerification() .withSandboxEnvironment() .withTargetActivity(HomeActivity.class) .build() .start(LoginActivity.this);This code will instantiate the ClearDil Kyc Module allowing only Id CARD & Driver License.
Not specifying the Allow methods will allow everything.